
Attwood Folding Anti-Glare Boat Navigation Light - (MW)
 Express Checkout
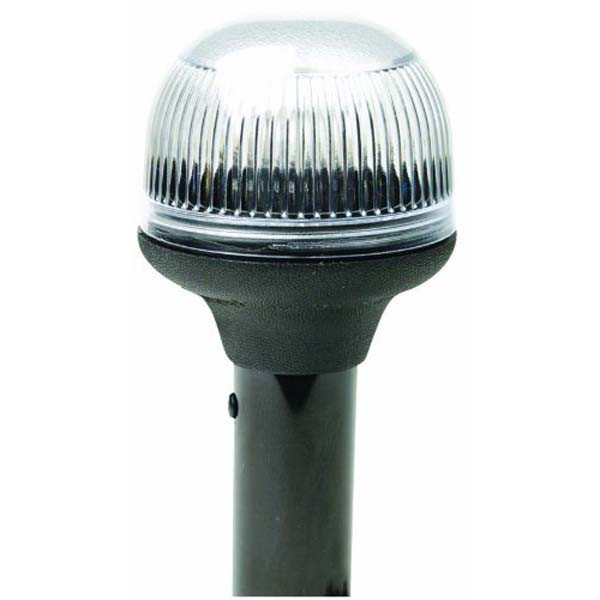
Attwood Folding All-Round Anti-Glare Boat Navigation Light
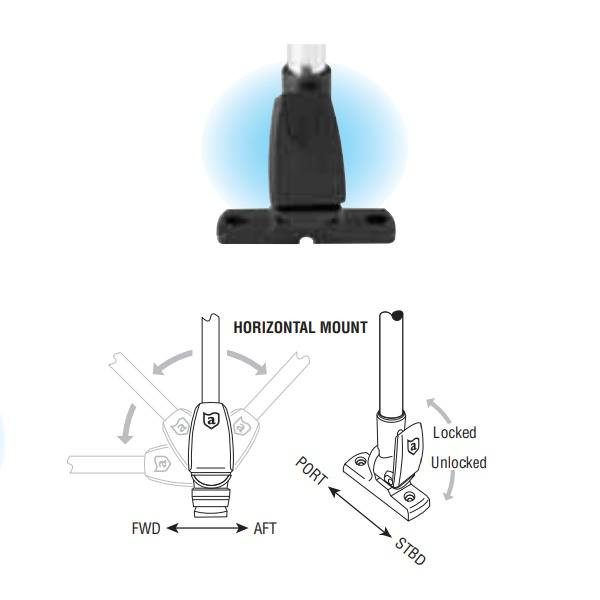
This Attwood Folding Anti-Glare Boat Navigation Light is built to last in the harsh marine environments with its non-corrosive materials and glass-filled polymer bases. It features a fold-down base that allows the light to swing 180° and can be mounted on both horizontal and vertical mounts. All of the wiring is concealed and protected within the pivoting base. In extreme conditions, if a 12ft./lb. force hits the base, the cam lock releases and allows base to swing down, reducing the chance of breakage to the base or pole. With a two mile, 360° light visibility, this anti-glare boat navigation light is for use on boats up to 39.4 ft.
Features:
- Fold-Down Base That Allows The Light To Swing 180°
- All Wiring Is Concealed and Protected Within The Pivoting Base
- Has Two Mile, 360° Visibility
- For Use On Boats Up To 39.4 ft.
- Comes With A 12" Black Plastic Pole
- Built To Last In Harsh Marine Environments
- Can Be Mounted On Both Horizontal and Vertical Mounts
- Non-Corrosive Materials
- Glass-Filled Polymer Base
- Includes a 9-Watt Wedge Base Lamp
- Includes Mounts
Specifications:
- Visibility: Two Mile, 360° Visibility
Installation Instructions
HOW TO INSTALL ATTWOOD FOLDING ALL-ROUND ANTI-GLARE LIGHT
Installation
- Choose a position near the transom that is accessible to wiring and has clearance below deck.
- Place base on the gunwale or deck. At desired location, be sure there I room to rotate the cover. Mark position for the 1-3/8” socket hole.
- Remove base and drill the 1-3/8” diameter socket hole, being careful not to crack the gel coat finish around the hole.
- Fit base into socket hole so it is parallel to boat centerline. Mark position and drill the three screw holes.
- Remove base and connect wires through socket hole. Connect one wire to the battery ground (-). Attach other wire to the 1-amp fused, positive (+) switched wire from the navigation light switch.
- Apply sealant between deck and light base. Fasten base with three #10 stainless steel screws. Do not overtighten screws.
Replacing Light Poles without a Locking Collar
- Align pole screw with slot in the existing base. Insert pole into base.
- Press down firmly to engage electrical connectors.
- To remove pole, pull straight up.
Replacing Light Poles with Locking Collar
- Align pole screw with slot in the base. Insert pole into base.
- Press down firmly to engage electrical connectors.
- Slide locking collar down to base, rotate until you can insert lower ring inside top of base.
- Press collar down into base and rotate until it tightens between pole and base.
- To remove light, rotate locking collar in opposite direction until it loosens, then pull up on pole.
Removing Locking Collar
- For bases that do not accept locking collar, remove screw at bottom of pole. Slide locking collar off end of pole.
- Replace screw in the upper screw hole.
Replacing Bulb
- Unscrew frosted globe counter-clockwise and remove.
- Pull bulb straight up. Replace with #906 9-Watt Wedge Base Replacement Bulb.
- Screw lens clockwise onto pole.
Clean the light with a mild soap and warm water solution. Never use solvents or abrasives that may damage the lens or housing of the light.
WARNING: Cancer and Reproductive Harm - P65Warnings.ca.gov
Product Specifications
| Brand | Attwood |
|---|---|
| Manufacturer Part No. | 5358-P12-7 |
| UPC | 022697535870 |
| Dimensions | 2.5" L × 4.87" W × 15.87" H |
| Shipping Weight | 0.56 lb |
| Shipping Box | 10x10x15" |























































Proudly serving customers across United States & Canada with Marine, RV parts and accessories.
Shipping Warehouse Locations:
New Jersey, USA
Florida, USA
- Contact Us
- Phone: 1-343-260-1526
About Us
Our goal is simple: to deliver the best quality marine parts you can count on. We focus on dependable service, fast shipping, and proven products that are either American-made or American-tested and approved for quality and reliability.